In order to improve the usability of your Xeditor instance, it is recommended to include toolbar buttons for the most common actions your authors will perform.
If you want to get an overview of the different button types Xeditor provides please have a look at the toolbar and button types chapter.
In order to reuse a button type, you can simply reference it in your configuration and adapt it to your schema. In order to insert an element called chapter, the button would look like this:
{
  extend: 'xeditor.insert',
  icon: 'fa-bookmark',
  tooltip: global_phrases['xeditor.tags.chapter'],
  data: {
    elementType: 'chapter'
  }
}
Here's what we did:
- by setting
extend: 'xeditor.insert'we indicate that we want to reuse the insert button template. All properties of the button template will be used as their default (see above) as long as we do not override them - we changed the
iconproperty to use a better fitting icon - we set a proper
tooltipin order to improve usability - by setting
elementTypewithin thedataobject we indicate which element Xeditor will insert upon click. In addition, Xeditor will disable the button if the target element is not valid at the current cursor position
Create a basic toolbar
In this section, we will reuse some existing Xeditor buttons and use existing templates in order to build new buttons adjusted to our schema. If you want to have some additional information on how exactly this works, check out our section about toolbar buttons and types.
In the basic setup we created a very basic toolbar looking like this (to be found in /src/js/config/toolbar.js):
module.exports = {
	createToolbarConfig: function(editor) {
		return [
			'xeditor.save',
			'xeditor.copy',
			'xeditor.cut',
			'xeditor.paste',
			'xeditor.undo',
			'xeditor.redo'
		];
	}
}
So now let's extend this with a couple of buttons adjusted to our schema!
First, we want to add a separator after the redo button in order to have a more clean UI.
In order to do so, we only have to add - to any position we want a separator to appear.
In this case, the result would look like this:
module.exports = {
	createToolbarConfig: function(editor) {
		return [
			'xeditor.save',
			'xeditor.copy',
			'xeditor.cut',
			'xeditor.paste',
			'xeditor.undo',
			'xeditor.redo',
			'-'
		];
	}
}
Now, we want to create a couple of buttons for the most common inline elements
- bold
- italic
- underline
since they are part of most schemas. If your schema doesn't offer all of these, just ignore the ones you are missing.
As learned previously, buttons meant to be used for inline formats use the button type xeditor.inlineformat.
As our sample schema also uses the element names bold, italic and underline, we can use those directly. If the names in your schema differ, the names have to be adjusted accordingly.
The three toolbar buttons would then look like this:
{
	extend: 'xeditor.inlineformat',
	icon: 'fa-bold',
	tooltip: global_phrases['xeditor.tags.bold'],
	contextSensitive: true,
	data: {
		type: 'inlineFormat',
		elementType: 'bold'
	}
}, {
	extend: 'xeditor.inlineformat',
	icon: 'fa-italic',
	tooltip: global_phrases['xeditor.tags.italic'],
	contextSensitive: true,
	data: {
		type: 'inlineFormat',
		elementType: 'italic'
	}
}, {
	extend: 'xeditor.inlineformat',
	icon: 'fa-underline',
	tooltip: global_phrases['xeditor.tags.underline'],
	contextSensitive: true,
	data: {
		type: 'inlineFormat',
		elementType: 'underline'
	}
}
In addition, most schemas offer a chapter like element. So, let's add a button that inserts this kind of element. In our demo schema, this element is called chapter.
Therefore, a button inserting this element looks like this:
{
	extend: 'xeditor.insert',
	icon: 'fa-bookmark',
	tooltip: global_phrases['xeditor.tags.chapter'],
	contextSensitive: true,
	data: {
		type: 'insert',
		elementType: 'chapter'
	}
}
If we add some additional separators, our final toolbar configuration should look like this:
module.exports = {
	createToolbarConfig: function(editor) {
		return [
			'xeditor.save',
			'xeditor.copy',
			'xeditor.cut',
			'xeditor.paste',
			'xeditor.undo',
			'xeditor.redo',
			'-',
			{
				extend: 'xeditor.inlineformat',
				icon: 'fa-bold',
				tooltip: global_phrases['xeditor.tags.bold'],
				contextSensitive: true,
				data: {
					type: 'inlineFormat',
					elementType: 'bold'
				}
			}, {
				extend: 'xeditor.inlineformat',
				icon: 'fa-italic',
				tooltip: global_phrases['xeditor.tags.italic'],
				contextSensitive: true,
				data: {
					type: 'inlineFormat',
					elementType: 'italic'
				}
			}, {
				extend: 'xeditor.inlineformat',
				icon: 'fa-underline',
				tooltip: global_phrases['xeditor.tags.underline'],
				contextSensitive: true,
				data: {
					type: 'inlineFormat',
					elementType: 'underline'
				}
			},
			'-',
			{
				extend: 'xeditor.insert',
				icon: 'fa-bookmark',
				tooltip: global_phrases['xeditor.tags.chapter'],
				contextSensitive: true,
				data: {
					type: 'insert',
					elementType: 'chapter'
				}
			}
		];
	}
}
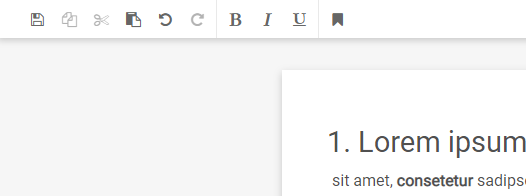
Your toolbar should then look like this:
Best practices for multiple schemas within one Xeditor instance (optional)
Since some buttons might be used in multiple schema configurations, it might make sense to define your custom buttons globally and reuse them within the schemas they should occur in. This way only the global button configuration has to be adjusted if needed, and all references to it will update automatically.
In order to do so, just follow these steps:
-
Create a new file
/src/js/config/buttons.js -
The file needs to export a button configuration, so we'll add the following snippet to it:
Ext.ux.xeditor.Config.addConfigGenerator(function(editor) {
	return {
		"button:xeditor.demo.chapter": {
			extend: 'xeditor.insert',
			icon: 'fa-bookmark',
			tooltip: global_phrases['xeditor.tags.chapter'],
			contextSensitive: true,
			data: {
				type: 'insert',
				elementType: 'chapter'
			}
		}
	};
});
Note: This will export a button configuration that will insert a chapter element. You can adjust this to an element matching your schema as well as add additional ones.
-
Include the just created file in your Xeditor configuration. In order to do so open up your
/src/js/index.jsfile and add the following require statement right to the top of it:require('./config/buttons'); -
Reuse your buttons in your desired
toolbar.jsfile by simply referring to it by using:'xeditor.demo.chapter'within it.
